What is a Vibroplex Bug Key: How to Use & Set It Up
Using and setting up a mechanical Morse key or Bug key like a Vibroplex is not as simple as that of a straight key and certain precautions need to be taken when it is used for radio communications applications.
Morse Code includes:
What is Morse code
How to learn Morse code
Morse code table / chart
Morse code keys & keyers
How to choose the best Morse key
How to use & set-up straight Morse key
How to use & set-up mechanical bug key
CW QSO
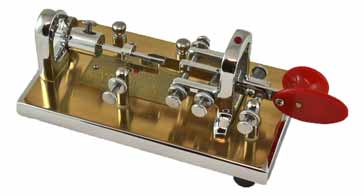
Vibroplex or semi-automatic mechanical bug keys have been used for many years and they are still available today.
As they were able to send the series of dots using a single movement, they considerably reduced the strain on operators, many of whom suffered from a condition called "Telegrapher's Cramp" which today would be referred to as repetitive strain injury.

Although the Vibroplex bug key was initially intended for telegraph operation, when Morse became widely used for two way radio communications, the Vibroplex key was adopted for this role as well.
The Vibroplex key patents have now expired and for some time, a number of manufacturers made various forms of these keys. Nowadays, electronic keyers are more popular and demand has fallen considerably with the result that Vibroplex is again the main manufacturer.
Today, the main market for bug keys is for radio hams who use them for establishing two way radio communications via Morse code around the globe.
In addition to this, telegraphy enthusiasts also use and collect them and as a result, original versions of these keys are sought after.
Bug key operation
The Vibroplex bug key was designed to reduce the number of wrist movements required to send a Morse code message.
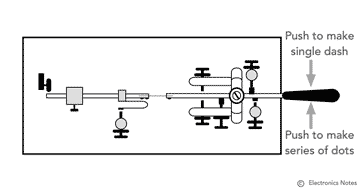
To achieve this the Vibroplex or bug key uses a paddle that moves from side to side - in this way it was a development of what was called a sideswiper key - this in itself helped.
However the main innovation of the bug key was to be able to generated the dots automatically. It used a vibrating arm or this.

When the paddle was pressed to the right, it caused the vibrating arm to move and start vibrating. This would enable a spring loaded contact on the arm to make repeated contact with a post to complete a circuit, thereby making the dots.
The dashes were made individually and this was done by pressing the paddle to the left hand side.
Bug key construction
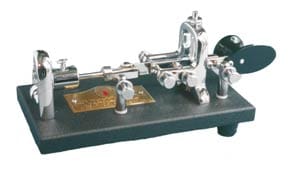
Virtually all mechanical bug Morse keys have the same basic structure. Once the Vibroplex patents expired, a number of companies started to manufacture them, most of which were in Asia.
As a result they were all based around the same basic structure, and this means that once someone has mastered sending Morse code on one bug key, then it is easy to transfer from one type to another. It also means that the same techniques can be used for setting them up and making adjustments.

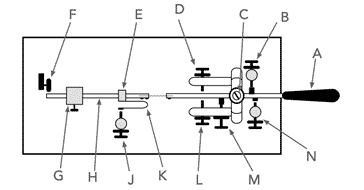
It can be seen from the diagram that the mechanical bug key is considerably more complex than a simple straight Morse key, but nevertheless it is reliable and not too difficult to set up and use.
There are a number of components to the mechanical bug key:
A - Paddle: The paddle os the part of the Morse key that is moved from side to side by the operator. Vibroplex keys have a slightly more complicated paddle that gives greater user comfort, but the basic paddle as shown is of the type used on many cheaper models that are normally sourced from Asia.
B - Dash lever tension: This adjustment controls the tension of the spring used to set the force required to close the dash contact.
C - Bearing tension: The lever for the bug key is normally held in place by a bearing. This adjustment sets the tension for this bearing.
D - Dash lever stop: This adjustment on the bug key adjusts the amount of travel before the dash movement makes contact to provide the dashes.
E - Attachment for the dot spring: The dot spring provides the contact with the dot contact - it needs to be a spring to enable the oscillation of the arm to be maintained.
F - Damper assembly: The damper on the mechanical bug key is incorporated to stop the vibrations of the arm after it has been returned to the rest position. It absorbs any vibrations of the arm after the dots have been sent, and prevents any spurious ones appearing.
G - Weight on vibrating arm: This weight can be moved along the arm and it alters the resonant frequency of the arm, and hence the rate at which the dots are made.
H - Vibrating arm: The vibrating arm is attached to the main lever via a thinnish section of metal strip that has spring to it. This enables the vibrating arm to vibrate when the paddle is pushed over to the right end of its travel.
J - Dot contact & adjuster: The dot contact and its adjuster provide the contact between the main contacts within the key and the vibrating arm. The adjuster enables the correct spacing to be obtained to get a 1:1 mark space ratio required for a series of dots.
K - Vibrating arm spring and dot contact: In order that the dot contacts are able to make contact for a suitable length of time, the connection with the vibrating arm needs to have some compliance. This is provided by the string and its associated contact.
L- Dot lever stop: The dot lever stop provides the degree of movement of the paddle needed to provide the dots. When the lever hits the stop, it causes the arm (H) to vibrate backwards and forwards causing the dots to be created.
M - Dot lever tension: The dot lever tension adjustment on the Vibroplex or mechanical bug Morse key alters the amount of force needed to push the paddle over to make the dots.
N - Dash contact: By moving the Vibroplex of mechanical bug key paddle over to the right, contact is made to provide the dashes using the dash contact.
P - Main lever: The main lever of the key forms the heart of the mechanism. It is supported by the main bearing, and has the paddle attached at one end and the vibrating arm with its connecting spring strip at the other.

How to use a Vibroplex or mechanical bug key
The Vibroplex or mechanical bug key is very different to a straight Morse key and it takes a little practice to get used to it. Not only are sideways movements used, but dots and dashes are created on different sides, and it is necessary to judge the number of dots.
However with a little practice, it is possible to become very proficient at using these keys for radio communications and they provide a significant improvement in operator fatigue and they can enable much faster sending.
When setting about using a mechanical bug, one of the first things to set up is the position. The bug key should be firmly positioned on the operating table so that it does not move.
Normally the keys have rubber feet that prevent most movement, but of this is insufficient, then it can be placed on a small rubber mat, or suction stickers can be used to anchor it in place.
The method of using the key is also important. Everyone has their own way of using these keys, and in the end, it is what works for any individual.
To start with, it is often best to have the key located on the desk or table with sufficient space so that the arm or wrist can be rested on the table.
Then position the hand (assuming right handed operation - the mirror or reverse will be true for left handed operators), place the thumb on the left side of the paddle, and the first finger to the right. In this way wrist movement can provide the movement for the paddle.
Dashes can be made by moving the wrist to the right to make contact as required. When a dot or series of dots is required, the side of the index finger can be made to move the paddle to the left for the required time. The index finger should used to keep the paddle in position for the whole of the series of dots.
The position should be such that the wrist does not feel constrained in any way - movement should be easy.
One of the main traps not to fall into is to set the dots much faster than the dashes will be made. Many operators will set the dot speed much faster than the dash speed, and the result is that the Morse code that is send is difficult to read. Try to set the dot speed so that the dot to dash ratio will be 1:3.
How to set up a Vibroplex mechanical bug key
In order to be able to send Morse code properly using a mechanical bug key such as a Vibroplex, or other make, it must be set up correctly. With a large number of different adjustments that can be made and it is important to adjust the settings correctly to ensure that good Morse code is sent to maintain reliable radio communications.
One method of adjusting the mechanical bug key / Vibroplex is set out below:
Back off lever tensions (B & M): Reduce the tension of both dot and dash lever tension screws to provide a good starting point.
Check bearing tension (C): With the lever tensions crews backed of, it is possible to detect the operation of the bearing and adjust it correctly for free or smooth but wobble free movement.
Adjust dash contact(N): The dash contact should next be adjusted to provide a comfortable amount of movement. Typically this will be larger for those practising using these Morse keys and less for more experienced operators and as the speed increases. It should typically balance the amount travel used for the dots and be sufficient to avoid even small touches producing unwanted dashes.
Set dash lever tension:(B) Adjust the dash lever tension to give the required force needed to create the dashes.
Adjust dot stop(L): The dot stop adjustment should be set to approximately match the amount of travel required for the dashes. The amount of travel should also enable the arm to have sufficient motion to provide a good number of dots. The space should also feel comfortable.
Dot contact adjuster(J): Next set the dot contact adjuster so that it provides good sounding dots. The dots should have a mark space ratio of around 1:1. This position is typically about where the arm rests when the vibrations have stopped.
Adjust position of arm weight(G): The weight on the arm or pendulum should be set to give the right period of vibration - it sets the dot speed and hence the speed or transmitting the Morse code. Be carful not to set it too fast - there can be a temptation to have the dots much faster than they should be, i.e. faster than the dashes are being sent, and this can result in Morse that is difficult to read.
Dot lever tension(M): Adjust the dot lever tens to suit the operation - typically it should be about the same as the dash lever tension to give balanced operation.
Hints and tips for using mechanical bug keys
As mechanical bug keys or Vibroplex keys are a little different to other types of Morse key, there are a few points that need to be noted.
Key clicks: One of the downsides of using a mechanical bug Morse key is that they can produce key clicks. This was particularly apparent on the older transmitters that may not have had any form of key click filtering, and where the current levels were higher.
This results from the fact that the dot mechanism does not make a particularly firm contact - as the contact makes and breaks, the contacts don't make full contact, or break the full contact instantly, and this gives rise to key clicks.
Two remedies have been used over the years to help overcome the issue:
- Key click filter: It used to be standard practice to build in additional key click filtering to slow the rise and fall times of the signal and mask the multiple makes and breaks occurring around the transition time. Modern transceivers tend to have better filtering, but it may be necessary to add some additional filtering if this becomes an issue.
- Use foam in the dot spring: Another well tried and tested technique was to place a small amount of foam in the gap of the end of the 'U' of the dot spring. This helps make a much firmer make and break for the contact. A little experimentation may be required with the type of foam, and the amount needed to maintain the operation of the key whilst reducing the key clicks.
Contact wear: One of the issues to note is that these keys are not suited for keying high voltages or currents, or for switching any loads that are inductive. As the dot contact is made by the dot spring making and breaking contact with the other dot contact. As a result the switching action is not at all hard, and sparks can easily be created. These sparks will quickly burn the contacts forming pits and peaks and this will make the keying less reliable.
The contacts should mate perfectly for maximum life. If necessary they can be cleaned using silver polish. Only if necessary they can be very lightly honed with the very lightly abrasive material used to clean relay contacts if they become pitted. Under no circumstances should emery paper or sandpaper be used as these abrasives leave an unwanted residue on the surfaces and they can excessively abrade the surface. care msut be taken at all times to preserve the contact surfaces.
The mechanical bug or Vibroplex key has been in use for many years, originally as a telegraph key, but later t came into its own for radio communications applications. In fact during World War II, these keys were widely used in some areas, providing faster Morse two way radio communications - a vital requirement for some radio links.
Sadly the use of these wonderful keys has diminished significantly in recent years with the rise of electronic keyers that are able to provide automatic generation of dots and dashes as well as incorporating iambic mode operation and in many cases there are memories for frequently used strings of characters. Nevertheless, the mechanical bug Morse key still has a place in many amateur radio communications stations.
 Written by Ian Poole .
Experienced electronics engineer and author.
More Ham Radio Topics:
What is ham radio
Callsigns
Morse code
Voice modes
Digital data modes
QRP operating
Operating awards
Codes & abbreviations
Ham bands overview
Operating via differnet propagation modes
Repeaters
Callsigns
Contact formats
Setting up a shack & buying equipment
Return to Ham radio menu . . .


